How to Perform Automatic 2-Sided Printing With the Duplex Unit in Windows
Applies To
Description
Four types of 2-sided printing are available: automatic standard, automatic folded booklet, manual standard, and manual folded booklet.
Note:
- 2-sided printing is only available for plain paper, in US Letter, A4, or B5 sizes.
- This feature isn't available with borderless printing — don't select a paper size with a "borderless" option (this may vary by model).
- If your printer has more than one paper cassette, make sure the correct paper Source is selected in your printing application.
- Only use paper suitable for 2-sided printing — otherwise print quality may decline, ink may bleed through to the other side, or the paper surface may smear.
Solution
Setting the Driver for a One-Off Print Job
- Open the document you want to print, then press Ctrl+P (or select File > Print).
-
Open the printer's own settings from the print dialog — look for a Printer Properties, Preferences, or similar button or link.
Note: Depending on the application, you may see a simplified Windows print dialog first, without direct access to the printer's own settings. If so, look for a More settings option — selecting this usually opens the full printer driver settings.
- Click the Main tab.
-
Click the drop-down menu next to 2-Sided Printing, then select either Auto (Long-edge binding) or Auto (Short-edge binding).
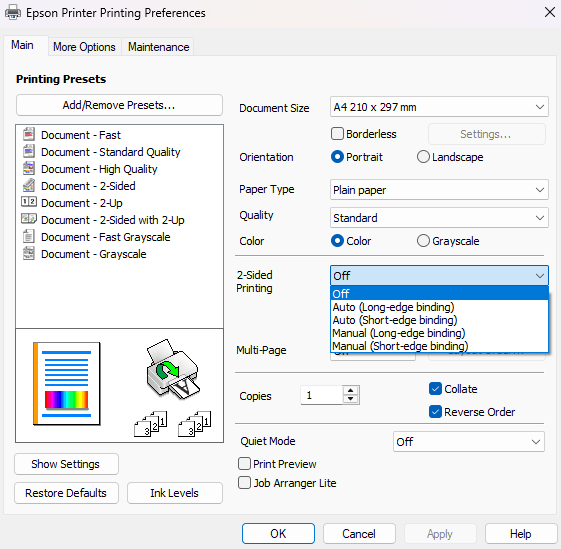
What each 2-Sided Printing option does:
Option What It Does Off Prints on one side. Auto (Long-edge binding) Prints on both sides of the paper automatically, to bind along the long edge. Auto (Short-edge binding) Prints on both sides of the paper automatically, to bind along the short edge. Manual (Long-edge binding) Prints on both sides of the paper manually, to bind along the long edge — see KA-01558 if your printer doesn't have a duplex unit. Manual (Short-edge binding) Prints on both sides of the paper manually, to bind along the short edge. Note: Available settings differ depending on the product model.
- Click OK to save this print's setting, then OK again to start printing.
Note: Exact steps may vary slightly by model — check your user's guide on the Epson website to confirm.
Setting the Driver for All Print Jobs
- Open the Devices and Printers folder, right-click your printer, and select Printing Preferences — see KA-01047 if you need help opening this folder.
- Click the Main tab.
- Click the drop-down menu next to 2-Sided Printing, select either Auto (Long-edge binding) or Auto (Short-edge binding), then click OK — this saves the setting for all future print jobs.
Note: When 2-sided printing isn't needed for a specific job, open the printer's settings from the Print dialog and change this back to Off for that job only.
