Mac Wi-Fi Helper for printers without a screen
RELATES TO:
- Wireless Networking: (Infrastructure mode)
- Epson products with integrated Wi-Fi connectivity
-
Operating Systems:
- Apple Mac Mountain lion (10.8), Mavericks (10.9), Yosemite (10.10)
EXPLANATION:
These instructional videos will guide you through installing for the first time or reinstalling your Epson product using the software installation CD supplied.
For assistance with setting up your product, please click the appropriate option below:
I have not attempted to install my product before
The video below will show you how to install the printer using the Epson software.
Installing the printer using Wi-Fi Auto Connect:
Video summary:
- Start installing the Epson software using the software installation CD provided by double clicking on the Epson folder to open it.
- Double click on the Install Navi icon to run the Epson installation software.
- Enter your administrator Username and Password and then click OK.
- Agree to the License agreement and then click Next button.
- Ensure that you have filled the ink tanks and then press the Next button to continue.
- Select any additional software you would like to install and then click Install.
- Ensure that the ink charging is complete and then press the Next button.
- Choose Wi-Fi Network connection
- Choose Wi-Fi Auto Connect
- If you are having problems, try turning off the firewall during the installation process.
- Click the OK button.
- Enter your administrator Username and Password and then click OK.
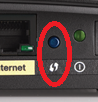
- Press and hold down the Wi-Fi button for 3 seconds on the printer's control panel.
- Make sure that the acquire the IP Address Automatically Using DHCP is selected and then press the Next button.
- Continue to follow the instructions on-screen to finish setting up your Epson printer.
- The Printers and Scanners window will open, click on the + icon to start adding the Epson product.
- Look for your Epson printer in the list and click the Add button. (Make sure that the Kind is Bonjour Multifunction)
- The Epson printer setup is complete, click the Red cross to close this window.
I have attempted to install my product before
To ensure that everything installs correctly you need to remove any Epson software that was installed on your computer during the first installation process.
|
Before continuing with setting up your product, reset your printer's network settings. To do this, power on your printer whilst pressing down the Information button. Keep both buttons pressed down until the Wi-Fi lights turn off. Some sequences have been shortened in the video to save time. |
Resetting Network Settings:
Before continuing with the installation you need to reset the network settings back to the default settings.
The video below gives instructions on how to do this.
Now that the network settings are reset, we need to start the software installation. This can be done by using the software CD supplied with the product or downloading the Epson network software & driver package from the Epson website.
When installing the product you have the two options, using Wi-Fi Auto Connect or if your router supports it by using WPS Setup
Installing the printer using Wi-Fi Auto Connect:
Video summary:
- Reset the printer's network settings by powering on your printer whilst pressing down the Information button. Keep both buttons pressed down until the Wi-Fi lights turn off.
- Start installing the Epson software using the software installation CD provided by double clicking on the Epson folder to open it.
- Double click on the Install Navi icon to run the Epson installation software.
- Enter your administrator Username and Password and then click OK.
- Agree to the License agreement and then click Next button.
- Ensure that you have filled the ink tanks and then press the Next button to continue.
- Select any additional software you would like to install and then click Install.
- Ensure that the ink charging is complete and then press the Next button.
- Choose Wi-Fi Network connection
- Choose Wi-Fi Auto Connect
- If you are having problems, try turning off the firewall during the installation process.
- Click the OK button.
- Enter your administrator Username and Password and then click OK.
- Press and hold down the Wi-Fi button for 3 seconds on the printer's control panel.
- Make sure that the acquire the IP Address Automatically Using DHCP is selected and then press the Next button.
- Continue to follow the instructions on-screen to finish setting up your Epson printer.
- The Printers and Scanners window will open, click on the + icon to start adding the Epson product.
- Look for your Epson printer in the list and click the Add button. (Make sure that the Kind is Bonjour Multifunction)
- The Epson printer setup is complete, click the Red cross to close this window.
Installing the printer using WPS
Installing the printer using WPS:
If your router supports WPS setup, you will see a button with icons like the ones shown below:
| Example 1 | Example 2 |
|---|---|
 |
 |
The video below will show you how to install the printer using WPS:
Video summary:
- Reset the printer's network settings by powering on your printer whilst pressing down the Information button. Keep both buttons pressed down until the Wi-Fi lights turn off.
- Start installing the Epson software using the software installation CD provided by double clicking on the Epson folder to open it.
- Double click on the Install Navi icon to run the Epson installation software.
- Enter your administrator Username and Password and then click OK.
- Agree to the License agreement and then click Next button.
- Ensure that you have filled the ink tanks and then press the Next button to continue.
- Select any additional software you would like to install and then click Install.
- Ensure that the ink charging is complete and then press the Next button.
- Choose Wi-Fi Network connection
- Choose WPS/AOSS Setup
- Press the WPS button on the router .
- Press and hold down the Wi-Fi button for 3 seconds on the printer's control panel, until the Wi-Fi lights flash alternately.
- If you are having problems, try turning off the firewall during the installation process.
- The Epson software is looking for the product please wait.
- Select the printer from the list shown, you may need to press the Search Again button if your product is not listed the first time.
- Make sure that the acquire the IP Address Automatically Using DHCP is selected and then press the Next button.
- Continue to follow the instructions on-screen to finish setting up your Epson printer.
- The Printers and Scanners window will open, click on the + icon to start adding the Epson product.
- Look for your Epson printer in the list and click the Add button. (Make sure that the Kind is Bonjour Multifunction)
- The Epson printer setup is complete, click the Red cross to close this window.
Installing the printer using a USB cable
If all other installation methods are not possible, then the Epson software will enable Wi-Fi setup using a USB cable.
The video below will show you how to do this:
Installing the printer using a temporary USB cable connection:
Video summary:
- Reset the printer's network settings by powering on your printer whilst pressing down the Information button. Keep both buttons pressed down until the Wi-Fi lights turn off.
- Start installing the Epson software using the software installation CD provided by double clicking on the Epson folder to open it.
- Double click on the Install Navi icon to run the Epson installation software.
- Enter your administrator Username and Password and then click OK.
- Agree to the License agreement and then click Next button.
- Ensure that you have filled the ink tanks and then press the Next button to continue.
- Select any additional software you would like to install and then click Install.
- Ensure that the ink charging is complete and then press the Next button.
- Choose Wi-Fi Network connection
- Choose Easy Wi-Fi Setup
- Turn the product on and then connect the computer and product together using a USB cable, don't remove the USB cable until you are instructed to do so.
- If you are having problems, try turning off the firewall during the installation process.
- Select the printer from the list shown, you may need to press the Search Again button if your product is not listed the first time.
- The Epson software will detect your Wi-Fi network (SSID) click OK to join this network.
- Enter your administrator Username and Password and then click OK.
- The Wi-Fi settings are being sent to the printer, please wait.
- Make sure that the acquire the IP Address Automatically Using DHCP is selected and then press the Next button.
- Continue to follow the instructions on-screen to finish setting up your Epson printer.
- You will see a message informing you that you can Remove the USB cable. Disconnect the USB cable from the printer.
- The Printers and Scanners window will open, click on the + icon to start adding the Epson product.
- Look for your Epson printer in the list and click the Add button. (Make sure that the Kind is Bonjour Multifunction)
- The Epson printer setup is complete, click the Red cross to close this window.